 Saving Files
Copying Files
Moving Files
Deleting Files
Creating Folder Directories
Saving Files
Copying Files
Moving Files
Deleting Files
Creating Folder Directories
![]() Finding Files
Finding Files
Saving Files
Copying Files
Moving Files
Deleting Files
Creating Folder Directories
Before learning how to Find, Save, Copy, Move, Delete files, etc. let's take a look at one of the most useful tools to help you manage your files. The program is called Windows Explorer. As you learn about file management in the steps to follow, refer to the image below of Windows Explorer. Notice the identification of the parts of Explorer below.
You may want to print this tutorial to have at your side as you go
through it. Or you can go through the practice exercises with 2 windows
open -- your Explorer window and your browser window. To do
this, open both windows. Then at the bottom of the screen right click on
the task bar and choose 'Tile Vertically'. Now the 2 windows are side by
side for you to follow the directions in the tutorial while you perform
the exercises in Explorer.
The
practice exercises are marked with a computer icon. 
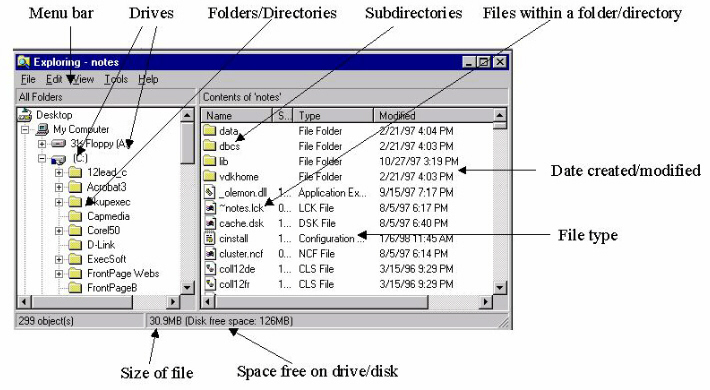
On the left side of your Explorer window are the folders in your chosen drive. The Explorer view begins with Desktop, followed by My Computer, and lists all your drives, followed by other folders or programs contained within the Desktop and My Computer.
Your directory structure is indicated by the indentation levels in Explorer's left pane. On the right side are the files and folders that are contained within the folder you select at left. Your selected folder appears to be open, with its contents spilling out into the right panel.
A minus sign on a folder means that it is fully expanded. A plus sign on a folder means that more files are contained inside it than are visible.
When you want to see details of your files (i.e. size, date created/modified), click on 'View', 'Details'. When you just want to see a list of files, click on 'View', 'List'.
Practice
Exercise
Practice moving around in the Explorer window by
Using a basic search, you indicate the file name or a portion of the file
name (if you don't know it all) and search either your entire computer,
or any drives or directories that you choose.
Here are some examples of ways of serching:
Practice using this tool by doing the following:
When saving
any document, using any application, you will follow these steps:
Perform the following steps to save a file:
Basically when copying files from one directory or drive to another, you
are going to select the file, then use one of these methods to copy
it to another location.
Try the following ways to copy files using the
different methods:
RIGHT CLICKING
MENU BAR
NOTE: You need both directories visible to use this option. Or
you can open up Explorer again and move the windows around for good
viewing.
TIP: You can copy several files at a time by
Perform these copy maneuvers:
Try moving a file by doing the following:
Try deleting files by doing the following: be sure these are your
"play" files that can be trashed!
Finding Files
If you save a file and then can't remember what you named it or where it
was saved, you can search for the file using the Windows Find feature.
Windows 95 allows you to locate files based on file name, a portion of
a name, date, and/or the text included in a file. To conduct a search,
you
can
The
Find dialogue box comes up which looks like the image below.
Your search results screen will list the file or files which match your
criteria. The screen functions like a window in Explorer or My Computer.
Here you may open, delete, move, and copy files.
*.doc (this says show all files with a .doc extension)
*.ppt (this says show all files with a .ppt extension)
budg* (this says show all files beginning with budg).
Practice
Exercise
You should see all the documents with the .doc extension on your C: drive
(hard drive).
When you find a file you are searching for, you can double click on the
file name and it will launch the application and open your file.
Saving Files
Although Windows Explorer is not used for saving files, this operation
will be covered here, as it involves the need to be familiar with the
directory structure of Windows in order to know where to save or retrieve
files when using applications.
Practice
Exercise
NOTE: When retrieving files with extensions
other than the
application's extension, you will need to click on 'All Files' in the
'Files of type:' box to see and select your files. For example, WORD
automatically puts the file extension .doc after the filename. If,
for example, you are using WORD and you saved a file with the name
'smith.let'. When you click on File, Open you will need to select 'All
Files' in the 'Files of type:' box to see that file because just the
files with the .doc extension will be showing in the file list. Copying Files
You can use several methods
for copying (and moving) files:
Practice
Exercises
KEYBOARD
DRAGGING
Drop it precisely on the folder to which it will go. A small box will be
visible
around the selected folder, so that you can drop it within that folder.
a) if copying it to the same drive, hold down the letter C on your keyboard
while you drag it. (Remember: C for copy!)
b) if copying to a different drive, just drag it.
(Windows 95 automatically copies rather than moves to different drives.)
If you
miss, check the folders above and below your selected folder to see if
the file landed there. Otherwise, you may have to search to locate it.
.
Practice
Exercise
Now let's try another copying maneuver. You are going to copy several
files from one drive to another using 2 windows:
Moving Files
The process of moving files from one place to another is essentially the
same. When right clicking, or choosing Edit from the menu,
Note: Dragging files only copies files -- they remain in 2
places. Also, remember you can move multiple files in the same manner as
described under 'Copying Files'. Practice
Exercise
Deleting Files
Deleting files and folders is easy - almost too easy. Here again,
you have several options:
Unless you have indicated in the recycle bin that you wish all files
that you delete to be permanently deleted, and unless you are on a floppy
drive, deleting will merely send your files to the recycle bin,
from where you can permanently delete them later.
WARNING: When you delete a folder, you delete all files in that folder.
Before deleting a folder, be sure that it does not contain files you wish
to keep!
Practice
Exercise
Remember, only files deleted from your hard drive can be retrieved
from the Recycle Bin.